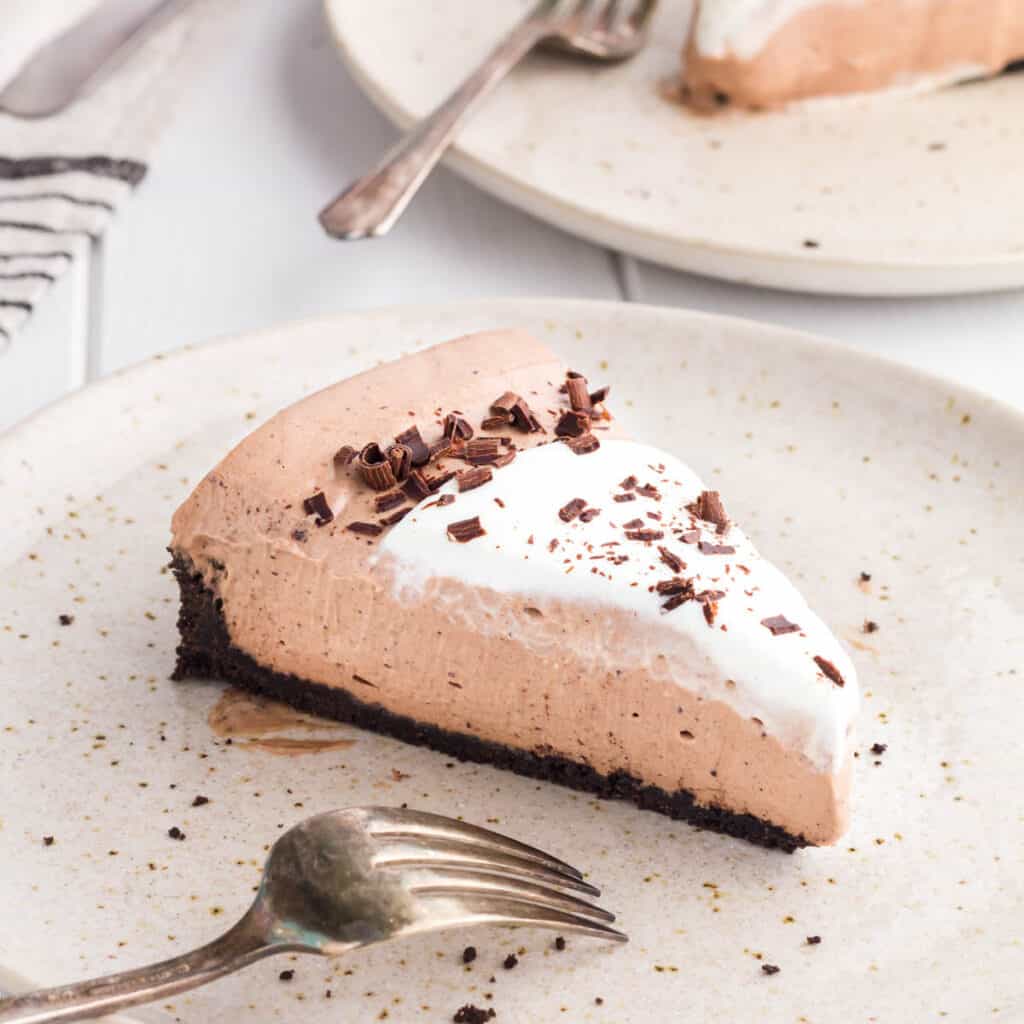
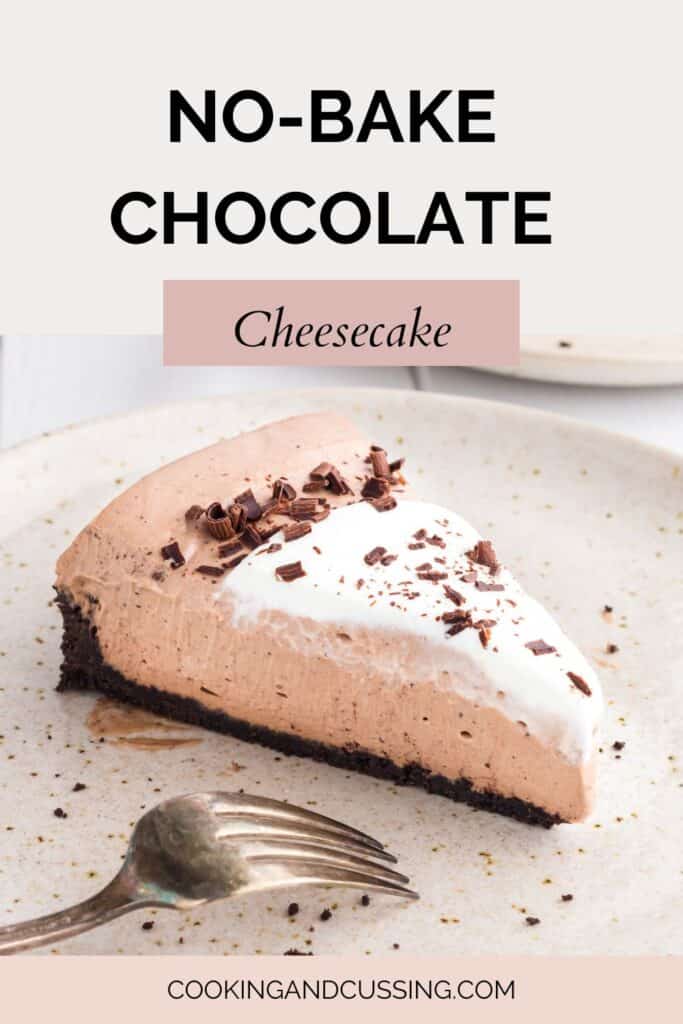
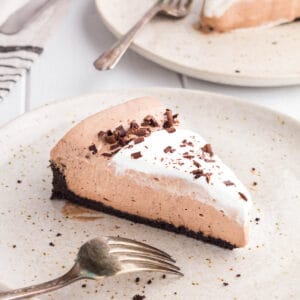
No-Bake Chocolate Cheesecake is unbelievably delicious and easy to make. If you’re a chocolate lover, you have to try this recipe. It has all the tang of cheesecake combined with decadent dark chocolate, and as advertised, the filling requires no baking!
For as long as I can remember, my family has made a no-bake cheesecake that everyone calls J.B. Pie after my great grandfather. Apparently, it was his favorite pie. It is still a favorite of everyone generations later.
When I was old enough to make it myself, I was surprised to find out just how simple the ingredients were. For the original J.B. Pie (AKA no-bake cheesecake), all you need is a graham cracker crust along with a filling made from cream cheese, sweetened condensed milk, lemon, and vanilla.
I’ve taken that same tried and true recipe and given it a chocolatey twist that you’re going to love! When cream cheese, Oreos, and chocolate are in the mix, you can’t go wrong.
Ingredients
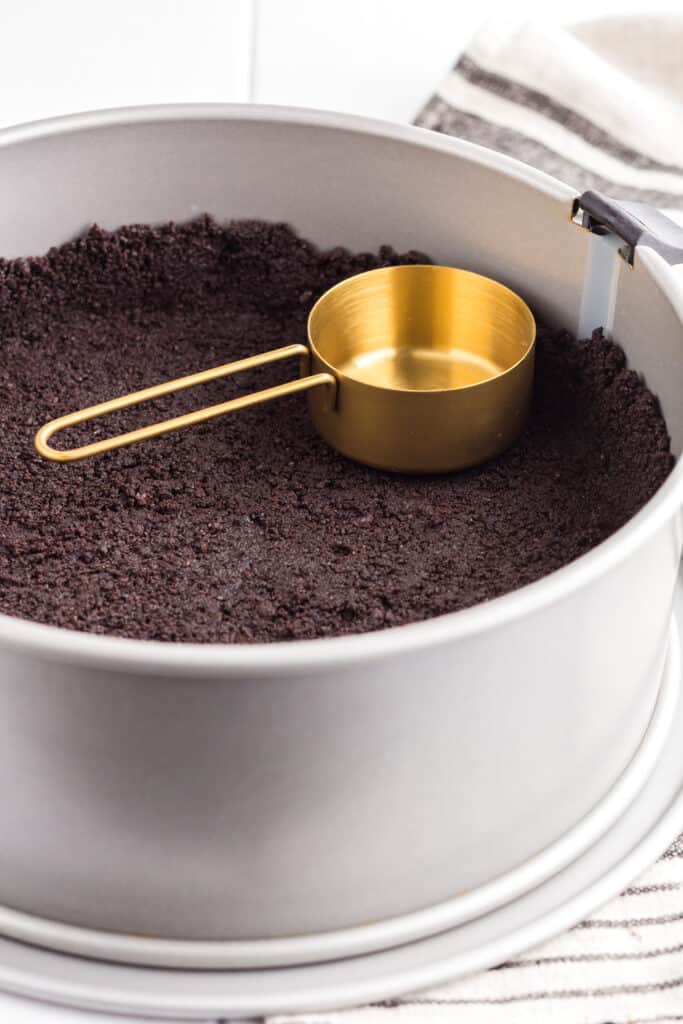
To make the recipe, you’ll need to start with an Oreo cookie crust. You need butter and Oreos for the crust. If you don’t like Oreos, we can’t be friends. Kidding! But you can still enjoy this recipe. Check out this post from Bake or Break on how to make a cookie crust from any cookie you like.
Once the crust is prepared, you make the cheesecake filling. Be sure your cream cheese is room temperature, and don’t try to shortcut this step! You’ll end up with lumpy cheesecake filling if you do. The ingredients for No-Bake Chocolate Cheesecake filling are:
- Cream cheese
- Sweetened condensed milk
- Sour cream
- Lemon
- Vanilla
- Dark chocolate bar – NOT chocolate chips
- Cocoa powder
- Instant espresso or espresso powder
- Salt
- Whipping cream
- Powdered sugar

Instructions
No-Bake Chocolate Cheesecake is simple to make. It requires several steps to get the creamy filling to the perfect consistency.
- Melt the dark chocolate and set it aside to cool.
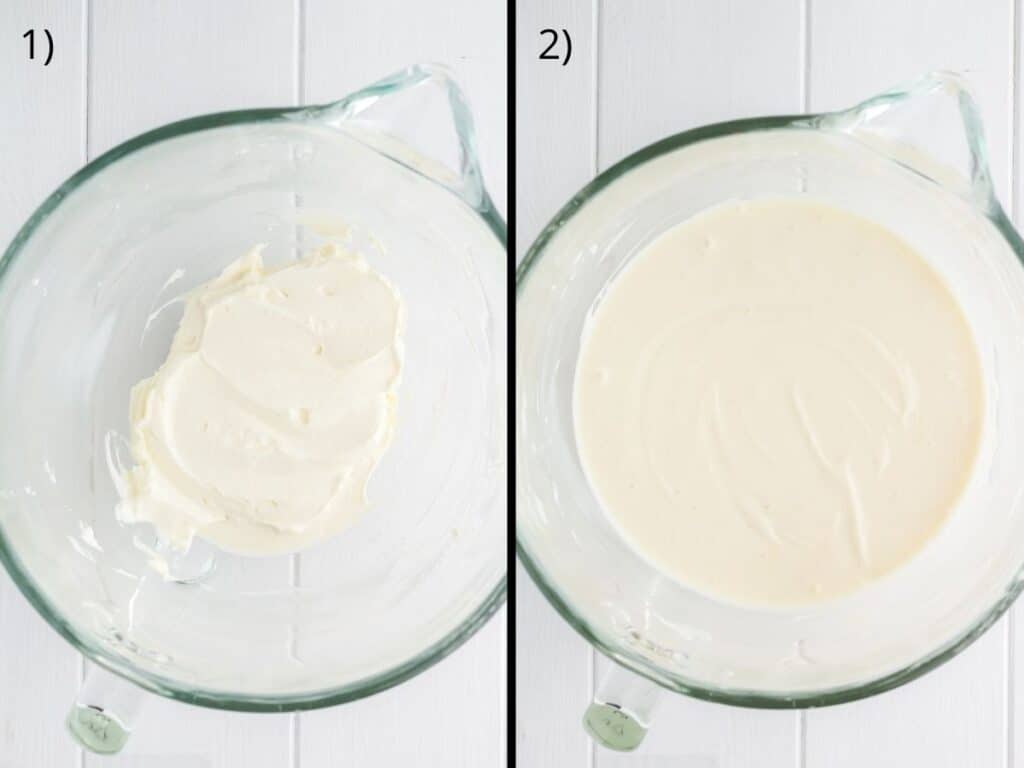
- Whip the cream cheese.
- Add the sweetened condensed milk and sour cream.
- Add the lemon juice, vanilla, and salt.
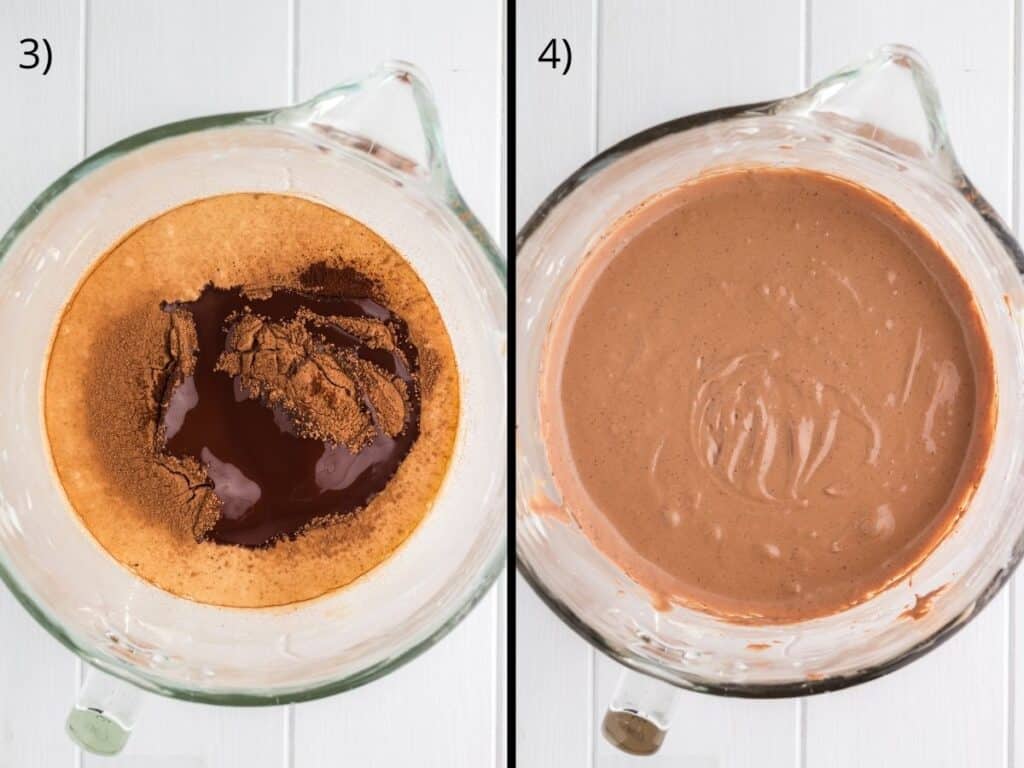
- Make it chocolatey by adding the cooled melted chocolate, cocoa powder, and espresso.
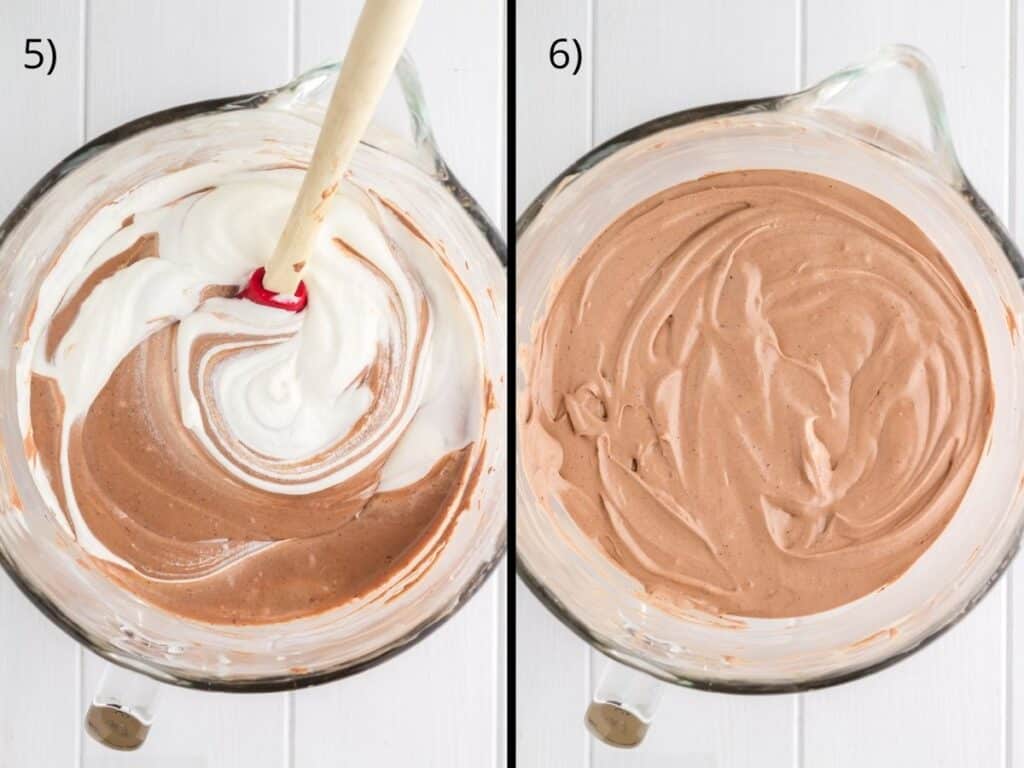
- Make a batch of whipped cream and split it into two portions.
- Fold one portion of the whipped cream into the chocolate cheesecake filling.
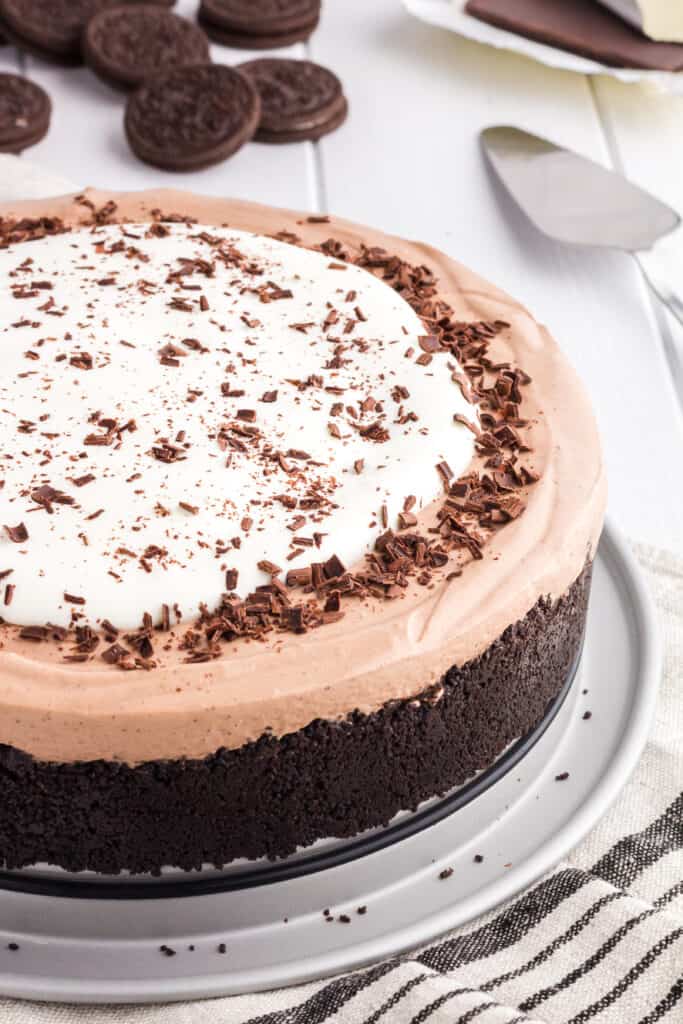
- Pour the pie into the cooled Oreo crust, and top with the reserved whipped cream.
- Chill for at least 8 hours until the filling is firm.
- Top with chocolate shavings for added pizzaz.
Substitutions
I love the deep, rich flavor that dark chocolate brings to this recipe, and it makes the filling slightly less sweet. If you’re not a fan of dark chocolate, you could use any kind of chocolate you’d like. Semisweet chocolate would be a great substitute. You could also use milk chocolate for a more mellow chocolate flavor.
Be sure to use a chocolate bar or melting chocolate, NOT chocolate chips. Chocolate chips have stabilizing ingredients that mess with the texture of the filling once it is completely cooled. I have found chocolate bars come in 3.5-4.5-ounce servings. The recipe calls for 4 ounces but +/- half an ounce is fine.
Equipment
You will need a stand mixer or hand mixer to make this recipe. You might be able to whisk it by hand, but you’d better have some biceps like Popeye because there is a lot of whipping in this recipe.
The recipe is prepared in a springform pan. If you don’t have one, you can use this link to purchase one if you’d like. A deep-dish pie pan is also an option.
Storage
- Serve: The assembled cheesecake must be cooled for a minimum of eight hours before serving.
- Store: No-Bake Chocolate Cheesecake will keep in an airtight container in the fridge for up to 5 days.
- Freeze: The cheesecake can be frozen in slices or whole. Store in an airtight container for up to 30 days.
- Defrost: Allow the cheesecake to thaw in the fridge. For a single slice, it will take roughly 24 hours to thaw. For a whole frozen pie, allow 2-3 days.

Top tip
I mentioned it earlier in the ‘Ingredients’ section, but be sure to let your cream cheese fully come to room temperature before you start making your cheesecake. Don’t try to skip or rush this step. Allow a full three hours for the cream cheese to sit at room temperature. If you use even slightly cold cream cheese, the filling will not be smooth- it will have cream cheese lumps.
My other hot tip for perfect chocolate cheesecake filling is to scrape, scrape, and then scrape the bowl some more. You’ll notice in the recipe that there are several “stop and scrape down the bowl” instructions. If you want a smooth texture and color, be sure to scrape down the bowl every time you stop the mixer. Get the sides and the bottom too so the ingredients are well incorporated.
RUN, don’t walk, to get the ingredients to make No-Bake Chocolate Cheesecake. It will make your chocolate dessert dreams come true! Let me know how much you love it in the comments below.
No-Bake Chocolate Cheesecake
Equipment
- 1 springform pan 9 or 10-inch
Ingredients
Oreo Crust
- 25 oreo cookies filling removed
- 5 Tb salted butter melted
No-Bake Chocolate Cheesecake Filling
- 4 oz dark chocolate bar
- 12 oz cream cheese room temperature
- 1 14 oz can sweetened condensed milk
- 1 cup sour cream
- 1 Tb fresh lemon juice
- 2 tsp vanilla extract
- ¼ tsp salt
- 1 tsp instant espresso powder
- ¼ cup cocoa powder sifted
- 2 cups heavy whipping cream divided
- ½ cup powdered sugar
Instructions
- To make the crust, crush the oreo cookies to a fine crumb and combine with the melted butter. Use the bottom of a measuring cup to press the crust into the springform pan. Be sure to press the crust up the sides of the pan until it's about 2 inches tall.
- Bake the crust at 350° for 8 minutes. Set aside to cool.
- Break the chocolate bar into large pieces and place in a microwave-safe bowl-microwave in 30-second increments, stirring between each. Remove the chocolate from the microwave once melted and set aside to cool.*
- Put the softened cream cheese in a stand mixer bowl with a whisk attachment. Beat on medium speed for one minute. Stop the mixer and scrape the bowl thoroughly.
- Whip the cream cheese for another minute on medium speed. Stop the mixer and scrape the bowl again.
- Turn the mixer back on to low speed and slowly add the sweetened condensed milk. Stop the mixer and scrape the bowl. Turn the mixer on to medium speed and mix until combined. Turn the mixer off and scrape the bowl.
- Add the sour cream, lemon juice, vanilla and salt. Turn the mixer on to medium speed for 30 seconds. Stop and scrape down the bowl.
- Add the sifted cocoa powder and cooled melted chocolate. Mix on low until completely combined. One last time, stop the mixer and scrape down the bowl. Let the mixer run for 15 seconds on low.
- In a mixing bowl, whip the heavy cream until it becomes frothy. Add the powdered sugar and whip until firm peaks develop. Resevre half of the whipped cream for garnish and place it in the fridge.
- Pour the other half of the whipped cream into the chocolate cheesecake. Gently fold the whipped cream into the cheesecake until just combined.
- Pour the cheesecake mixture into the cooled cookie crust and top with the reserved whipped cream and optional chocolate shavings. Refrigerate for a minimum of 8 hours, preferably 12 hours.
Notes
Frequently Asked Questions
Check out this method from My Baking Addiction.
Yes. Semisweet would be my recommendation. You could also use milk chocolate for a mellow flavor.
The major issue with a store-bought crust is that they tend to be small and shallow. If you want to use a store-bought crust, either half the recipe or plan to make two pies.
Related Posts:


Latest posts by Hailey (see all)
- Sour Cream and Onion Skillet Biscuit - April 9, 2023
- Bacon Pesto Pasta - March 30, 2023
- Pimento Mac and Cheese - March 19, 2023
This is the tastiest no-bake chocolate cheesecake ever! My gosh, would definitely make it again!
It is WAY too hot to be turning on the oven these days, so I have been living off of no bake recipes, and this one is a winner! Thank you so much for sharing 🙂
Looks incredibly delicious. Feel like having a big bite right now....recipe looks fantastic....
Brilliant recipe! The cheesecake came together very quickly and set perfectly well! The flavour is amazing - not too sweet, but rich and decadent! Wil definitely make it again soon!
You had me at Oreo Cookie Crust! Wow, this was fantastic. Gonna make again real soon.
Hailey, I can't wait to try this recipe for Andrea and Jillian's kids. My celiac crew. Now that we have gluten free Oreos this will be a great addition to our desserts. Thanks for the recipe.
Yay! I'm so glad to hear this recipe works for the crew. I hope everyone loves it.